Hackable places
I recently got my Raspberry Pi, a cheap single board Linux computer designed for education and hacking. I already have OLPC laptops and Arduinos as hackable places, but it looked like fun. Now I have it I can assess it as a learning tool in home and school contexts.
You can buy from Element 14/Farnell or RS Components for A$38 but after freight it was A$56 (A$1 is approximately US$1). It arrived from Element 14 in 2 days. Home/school will probably have some of the accessories at hand, but if not the full cost is:
Rasperry Pi with tax and freight A$56
Power supply 5V micro USB A$20
Memory card 4GB A$15
AV cable A$2
USB keyboard A$14
USB mouse A$5
Television ?
Total A$112+
Compare that with another Linux computer designed for educational hacking, the OLPC laptop at $188 or more realistically $200+ with freight. Consider an old unused PC or laptop as a hacking platform.
Writing the OS, Raspian (Debian) Wheezy, to the memory card was easy, once I really read the instructions. I used the Linux method to setup the card using dd an OLPC XO laptop, I did have to use another computer to unzip the 1.9GB OS when it failed on the XO.
Not having a hi definition TV I used composite video (the yellow plug). I was disappointed with the screen resolution. Its presumably quite good on a hi def tv.

Next step was to run the Raspberry Pi remotely from an OLPC laptop using ssh.
Get the IP address of the raspberry Pi
hostname -I
That's the last time you will need the Rasperry Pi keyboard or TV unless its IP address changes. On the OLPC XO laptop in Terminal enter:
That brings up the Raspberry PI command line interface on the XO. You can run xwindow programs, they display using the XO's window manager.

You cannot start the Pi's desktop with the usual startx, but you can run almost everything using the XO desktop eg
pcmanfx the file manager
midori web browser
leafpad text editor
idle python IDE
lxtask the task manager
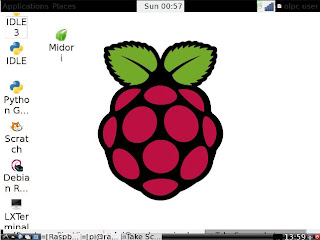
Though startx does not start the Pi desktop but startlxde gives some success. In Sugar, the desktop is always hidden but the bottom menu bar is available. Using OLPC build 3 13.1.0 in Gnome, the Pi's desktop is visible, possibly due to a bug where the XO's Gnome desktop is not displayed.
So why use the Pi at home or school? School is unlikely to have a class set of TV's or space for them. Home is unlikely to have the USB keyboard, power supply and cables. But both school and home are likely to have older underpowered PC's or laptops (which can be reimaged to Linux if desired) and used as hacking platforms. Those with OLPC laptops have a computer, purpose designed for hacking.
The Pi does provide an additional hacking platform, having multiple platforms is a good thing, not all tasks 'click' or work for all learners.
The Pi can be used as an I/O board like the Arduino. Unfortunately its I/O pins are not protected and can be damaged by 0V (27mA) or voltage >3.3V. Compare with the Arduino I/O which can source up to 20mA to ground and be connected to 5V.
You can buy from Element 14/Farnell or RS Components for A$38 but after freight it was A$56 (A$1 is approximately US$1). It arrived from Element 14 in 2 days. Home/school will probably have some of the accessories at hand, but if not the full cost is:
Rasperry Pi with tax and freight A$56
Power supply 5V micro USB A$20
Memory card 4GB A$15
AV cable A$2
USB keyboard A$14
USB mouse A$5
Television ?
Total A$112+
Compare that with another Linux computer designed for educational hacking, the OLPC laptop at $188 or more realistically $200+ with freight. Consider an old unused PC or laptop as a hacking platform.
Writing the OS, Raspian (Debian) Wheezy, to the memory card was easy, once I really read the instructions. I used the Linux method to setup the card using dd an OLPC XO laptop, I did have to use another computer to unzip the 1.9GB OS when it failed on the XO.
Not having a hi definition TV I used composite video (the yellow plug). I was disappointed with the screen resolution. Its presumably quite good on a hi def tv.

Rasperry Pi GUI, LXDE displayed on a composite TV
Next step was to run the Raspberry Pi remotely from an OLPC laptop using ssh.
Get the IP address of the raspberry Pi
hostname -I
That's the last time you will need the Rasperry Pi keyboard or TV unless its IP address changes. On the OLPC XO laptop in Terminal enter:
ssh -Xipaddress -l logon
for example
ssh -X 10.1.1.5 -l Pi
That brings up the Raspberry PI command line interface on the XO. You can run xwindow programs, they display using the XO's window manager.

The Rasperry Pi File Manager displaying on an XO
You cannot start the Pi's desktop with the usual startx, but you can run almost everything using the XO desktop eg
pcmanfx the file manager
midori web browser
leafpad text editor
idle python IDE
lxtask the task manager
Though startx does not start the Pi desktop but startlxde gives some success. In Sugar, the desktop is always hidden but the bottom menu bar is available. Using OLPC build 3 13.1.0 in Gnome, the Pi's desktop is visible, possibly due to a bug where the XO's Gnome desktop is not displayed.

The Pi's desktop, LXDE displaying on an XO running Gnome, (build 3, 13.1.0)
So why use the Pi at home or school? School is unlikely to have a class set of TV's or space for them. Home is unlikely to have the USB keyboard, power supply and cables. But both school and home are likely to have older underpowered PC's or laptops (which can be reimaged to Linux if desired) and used as hacking platforms. Those with OLPC laptops have a computer, purpose designed for hacking.
The Pi does provide an additional hacking platform, having multiple platforms is a good thing, not all tasks 'click' or work for all learners.
The Pi can be used as an I/O board like the Arduino. Unfortunately its I/O pins are not protected and can be damaged by 0V (27mA) or voltage >3.3V. Compare with the Arduino I/O which can source up to 20mA to ground and be connected to 5V.
posted by Unknown at 10:06 PM
0 comments


